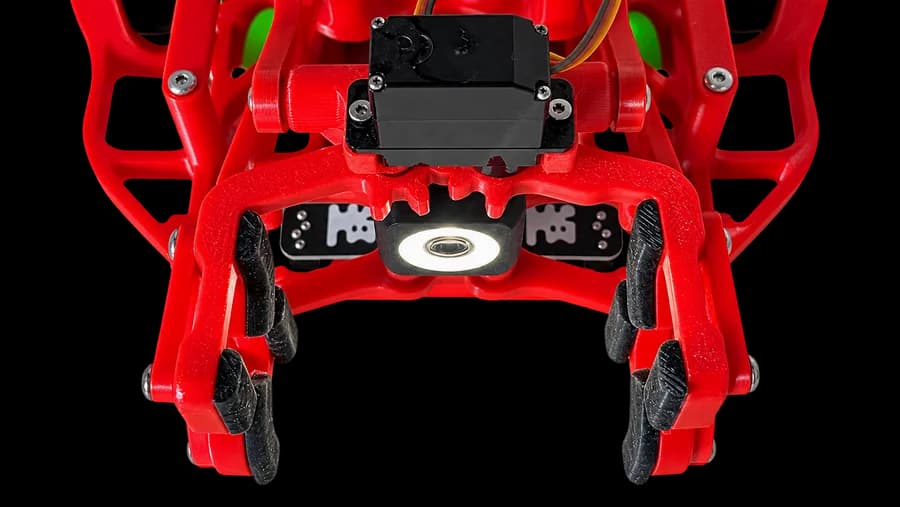
What is a servo?
In previous lessons, the robot learned to drive, measure travel, and use sensors. Now it will interact with objects: pick them up, lift them, and carry them.
We gave a wheel motor a speed and direction. A positional servo receives a shaft position instead. Its motor, gearbox, position sensor, and control circuit work together to move toward that position and hold it under load.
| Wheel motor | Positional servo |
|---|---|
| Rotates continuously | Moves within a working range |
| Receives a speed command | Receives a position command |
| Moves the whole robot | Moves an arm or mechanism |
One servo opens and closes the gripper. Another moves the elevator. Each mechanism will have two main positions: open / closed and down / up.
Connections and preparation
Check the gripper assembly and final assembly. The empty mechanism should move without binding, and wires must stay clear of the linkages.
A servo has three connections: power, GND, and signal. The Control Deck provides D22–D27 servo connectors. See their locations in lesson 3.
For this lesson, we will use these connections:
| Mechanism | Signal pin | Object name |
|---|---|---|
| Gripper | D22 |
gripper |
| Elevator | D23 |
elevator |
These are our chosen pins for the examples. If your assembly uses different connectors within D22–D27, change GRIPPER_PIN and ELEVATOR_PIN. Write the number 22 in code, not D22.
Switch off power before connecting wires and check polarity against the board labels. Use the robot's normal power supply for the mechanisms; USB alone may be insufficient. Before the first angle test, disconnect the arm from the servo shaft and support the elevator. Test the free shaft first, then switch off power and attach the arm in a suitable position.
Libraries for this lesson
This lesson uses LittleRobot 1.0.3 from the course ZIP and the separate Arduino Servo library. Each has its own role:
| Library | Purpose |
|---|---|
LittleRobot.h |
Board and encoder setup, button wait, driving, and LED |
Servo.h |
Control pulses for the gripper and elevator servos |
Barigadam_MotionSensor.h |
LittleRobot dependency required for compilation |
- Install Barigadam_MotionSensor, then LittleRobot, following the course guide. These examples do not require a connected motion sensor.
- In Arduino IDE, open Tools → Manage Libraries…, find Servo by Arduino, and install it. It is not included in the three course ZIPs.
- Select Arduino Mega or Mega 2560. The examples below target this board.
Barigadam_ColorSensor is not used here. Your sketch only needs these two includes:
#include <LittleRobot.h>
#include <Servo.h>

LittleRobot robot;
Servo gripper;
Servo elevator;
robot, gripper, and elevator are separate objects. Call driving commands on robot and position commands on the corresponding Servo object. LittleRobot 1.0.3 has no built-in gripper or elevator commands. robot.begin(true, true) sets up the board and encoder count directions; each servo still needs its own attach() call.
Basic Servo commands
| Command | Purpose |
|---|---|
gripper.attach(22) |
Assign the gripper's signal pin |
gripper.write(90) |
Set a shaft position |
gripper.read() |
Return the last commanded position, not a measured angle |
gripper.detach() |
Stop sending control pulses |
For the positional servo in this lesson, pass an angle from 0 to 180 to write(). The mechanism's usable range may be much smaller. The angle in write() is the library's scale, not a measurement: the physical angle depends on the servo model and pulse widths. 90 is a position command, not a speed or an additional 90-degree turn. Calling write(90) again keeps the same target. See the official Servo reference for the command details.
The program continues immediately after write(), so we allow time for movement with delay(). Arduino keeps sending pulses during the pause and during robot driving commands. Do not call detach() while supporting a raised load: the mechanism may stop holding it.
First servo test
Start with one servo and a small change in position. Disconnect its arm from the shaft for this test. The wheels remain stationary.
#include <LittleRobot.h>
#include <Servo.h>

LittleRobot robot;
Servo gripper;

const int GRIPPER_PIN = 22;
const int START_ANGLE = 90;
const int TEST_ANGLE = 95;

void setup() {
  robot.begin(true, true);

  // First press: move the free shaft to its middle position.
  robot.waitButtonPressRelease();
  gripper.attach(GRIPPER_PIN);
  gripper.write(START_ANGLE);
  delay(700);

  // Second press: test a small movement and return.
  robot.waitButtonPressRelease();
  gripper.write(TEST_ANGLE);
  delay(700);
  gripper.write(START_ANGLE);
  delay(700);
}

void loop() {
}
Upload the program for Arduino Mega 2560. Press and release the button once to move the shaft to its middle position. Press it again to make a small movement and return. An empty loop() means the test runs once after power-on or reset.
attach() enables pulses, so movement can start at that call. Waiting for the button before attach() gives you time to prepare.
To test the elevator separately, reuse this sketch and change GRIPPER_PIN to its connector number (23 in our example). The object named gripper will then control that servo: the object name does not select a mechanism. Do not lift a load while testing the free servo.
Tune the gripper and elevator angles
The same shaft angle can produce different arm positions depending on how the arm and linkages were assembled. Example values are therefore not a calibration for every robot.
- Use the first test to set a known free-shaft position, then switch off power.
- Attach the arm so the mechanism is clear of its stops at that position. Support the elevator while power is off.
- Reuse the first sketch with an empty mechanism: set
START_ANGLEto a tested starting position andTEST_ANGLEto an angle5degrees higher or lower. Upload it again. The first press setsSTART_ANGLE; the second testsTEST_ANGLEand returns. Keep subsequent tests within a checked range. - Find the open-gripper position, then a closed position that holds the practice object without excessive squeezing.
- Separately find the elevator's lower position and a height that clears the field while carrying the object.
If the mechanism binds, buzzes strongly, or gets hot, switch off power and reduce its travel. Do not begin with a full sweep from 0 to 180 degrees.
Record four results as constants. The numbers below illustrate the code. Replace them with your tested values in every sketch before running it.
const int GRIPPER_OPEN = 90;
const int GRIPPER_CLOSED = 70;
const int ELEVATOR_DOWN = 90;
const int ELEVATOR_UP = 110;
In this example, decreasing the angle closes the gripper and increasing it raises the elevator. Your assembly may work in the opposite direction. Keep the constant names and change the numbers.
Grab, lift, and release
Test the complete mechanism before driving. Use a small, light object that fits between the gripper arms.
#include <LittleRobot.h>
#include <Servo.h>

LittleRobot robot;
Servo gripper;
Servo elevator;

const int GRIPPER_PIN = 22;
const int ELEVATOR_PIN = 23;

// Replace these angles with your calibration results.
const int GRIPPER_OPEN = 90;
const int GRIPPER_CLOSED = 70;
const int ELEVATOR_DOWN = 90;
const int ELEVATOR_UP = 110;
const int SERVO_WAIT_MS = 700;

void setup() {
  robot.begin(true, true);
  robot.waitButtonPressRelease();

  elevator.attach(ELEVATOR_PIN);
  elevator.write(ELEVATOR_DOWN);
  delay(SERVO_WAIT_MS);
  gripper.attach(GRIPPER_PIN);
  gripper.write(GRIPPER_OPEN);
  delay(SERVO_WAIT_MS);

  // Place the object, move your hands away, then press the button.
  robot.waitButtonPressRelease();

  gripper.write(GRIPPER_CLOSED);
  delay(SERVO_WAIT_MS);
  elevator.write(ELEVATOR_UP);
  delay(1000);
  elevator.write(ELEVATOR_DOWN);
  delay(SERVO_WAIT_MS);
  gripper.write(GRIPPER_OPEN);
  delay(SERVO_WAIT_MS);
}

void loop() {
}
The first press lowers the elevator and opens the gripper. Place the object between the arms, then press the button again. The robot should grab it, lift it, lower it onto the field, and only then release it.
The 700 ms pause is a starting value. Increase it if the mechanism needs more time. Waiting does not confirm a successful grip: this program has no sensor checking whether the object is present.
Smooth mechanism movement
An abrupt position change can make a raised object sway. We can send intermediate angles with short pauses. This smooths the command changes but does not measure the shaft's actual speed.
This fragment is a helper function, not a standalone sketch. The full program below includes it as well.
void moveServoSlowly(Servo &servo, int fromAngle, int toAngle) {
  int step = (toAngle >= fromAngle) ? 1 : -1;

  for (int angle = fromAngle; angle != toAngle; angle += step) {
    servo.write(angle);
    delay(20);
  }

  servo.write(toAngle);
  delay(300);
}
Servo &servo lets the function use an existing gripper or elevator object. fromAngle is the previous commanded position and toAngle is the new one. step chooses increasing or decreasing angles, so both directions work.
For example, after setting the elevator to ELEVATOR_DOWN and waiting for it to move, call:
moveServoSlowly(elevator, ELEVATOR_DOWN, ELEVATOR_UP);
Increasing delay(20) slows the command changes. The final pause allows the mechanism to finish moving. Use only a tested range: smooth movement cannot protect against an unsuitable endpoint.
Practice: transport an object
Combine the mechanism with encoder driving from lesson 5. Put an object directly ahead and mark a delivery zone near the start. The robot will approach, grab, lift, and reverse to that zone.
Test the route without an object first. Tune the approach so the object will end up between the open arms. Its location is known in this exercise; the robot does not search for it with a sensor.
Use this approach command:
robot.MotorsMoveSync(25, 25, 90, 270);
This is the short form from lesson 5:
| Argument | Value | Meaning |
|---|---|---|
speed_0 |
25 |
Initial motor command |
speed |
25 |
Working motor command |
enc_1 |
90 |
First segment, in wheel degrees |
enc_2 |
270 |
Second segment, in wheel degrees |
The optional fifth argument, enc_3, specifies a deceleration segment. It is omitted here and defaults to 0. Total travel is 90 + 270 = 360 wheel degrees. Equal speed_0 and speed keep the speed command constant during the first segment. This is not a heading angle of the robot.
As in lesson 5, use settings for stopping and direction. The defaults are stop = 1 (stop after movement) and direction = 1 (forward). To return:
robot.MotorsMoveSync_Settings.direction = -1;
robot.MotorsMoveSync(25, 25, 90, 270);
After a short call, MotorsMoveSync_Settings returns to its saved values. This program does not save custom settings, so direction returns to 1 and stop to 1. Set direction = -1 again before each reverse movement.
Complete program
Copy your four tested angles into the constants before uploading. Start with empty mechanisms near their initial positions: the first position command after attach() has no smooth transition.
#include <LittleRobot.h>
#include <Servo.h>

LittleRobot robot;
Servo gripper;
Servo elevator;

const int GRIPPER_PIN = 22;
const int ELEVATOR_PIN = 23;

// Replace these with tested angles for your assembly.
const int GRIPPER_OPEN = 90;
const int GRIPPER_CLOSED = 70;
const int ELEVATOR_DOWN = 90;
const int ELEVATOR_UP = 110;

const int DRIVE_SPEED = 25;
const int FIRST_DEGREES = 90;
const int SECOND_DEGREES = 270;

void moveServoSlowly(Servo &servo, int fromAngle, int toAngle) {
  int step = (toAngle >= fromAngle) ? 1 : -1;
  for (int angle = fromAngle; angle != toAngle; angle += step) {
    servo.write(angle);
    delay(20);
  }
  servo.write(toAngle);
  delay(300);
}

void setup() {
  Serial.begin(9600);
  robot.begin(true, true);

  Serial.println("Press button: prepare mechanisms");
  robot.waitButtonPressRelease();
  elevator.attach(ELEVATOR_PIN);
  elevator.write(ELEVATOR_DOWN);
  delay(700);
  gripper.attach(GRIPPER_PIN);
  gripper.write(GRIPPER_OPEN);
  delay(700);

  Serial.println("Press button: start delivery");
  robot.waitButtonPressRelease();

  Serial.println("1. Approach");
  robot.MotorsMoveSync(DRIVE_SPEED, DRIVE_SPEED,
                       FIRST_DEGREES, SECOND_DEGREES);

  Serial.println("2. Grab and lift");
  moveServoSlowly(gripper, GRIPPER_OPEN, GRIPPER_CLOSED);
  moveServoSlowly(elevator, ELEVATOR_DOWN, ELEVATOR_UP);

  Serial.println("3. Return with object");
  robot.MotorsMoveSync_Settings.direction = -1;
  robot.MotorsMoveSync(DRIVE_SPEED, DRIVE_SPEED,
                       FIRST_DEGREES, SECOND_DEGREES);

  Serial.println("4. Lower and release");
  moveServoSlowly(elevator, ELEVATOR_UP, ELEVATOR_DOWN);
  moveServoSlowly(gripper, GRIPPER_CLOSED, GRIPPER_OPEN);

  // Move clear of the object after delivery.
  robot.MotorsMoveSync_Settings.direction = -1;
  robot.MotorsMoveSync(25, 25, 45, 45);
  robot.LED(1);
  Serial.println("Delivery finished");
}

void loop() {
}
The first press prepares the mechanisms. Then place the robot at the start and the object on its route. The second press starts delivery. Serial Monitor at 9600 baud shows each stage, and the board LED lights at the end.
The sequence is: approach and stop → close → lift → return and stop → lower → open → move clear. LittleRobot commands wait for driving to finish, while Servo continues controlling the mechanisms. The button starts the task; it does not act as an emergency stop inside a driving command.
Independent tasks
- Tune the approach distance for your field by changing
SECOND_DEGREES. Total travel isFIRST_DEGREES + SECOND_DEGREES; settingFIRST_DEGREES = 0skips the first segment. - Complete three deliveries in a row without dropping the object. Record the successful angles, pauses, and speed.
- Try an object of a different size. Change only the closing angle and explain why squeezing harder is not always a solution.
- After tuning, add a motion-sensor turn from lesson 8 to deliver to another zone. Test the new route without a load first.
Troubleshooting
Compilation errors
If Servo.h is missing, install Servo by Arduino through Library Manager. If Barigadam_MotionSensor.h is missing, install the course Barigadam_MotionSensor ZIP. If robot methods are missing, check that LittleRobot 1.0.3 from the course is installed and that the compiler selects its directory.
The servo does not move
Check power, polarity, the signal pin, and the attach() call. Make sure you pressed and released the button: the examples deliberately wait before the first movement. Test the servo separately with the first sketch.
The wrong mechanism moves
Check the gripper and elevator signal connections. Match GRIPPER_PIN and ELEVATOR_PIN to your assembly.
The mechanism buzzes or hits a stop
Switch off power. Check the arm installation and reduce the angle range. A longer pause cannot fix a mechanical obstruction.
The board resets while lifting
Check the normal power supply, battery charge, and contacts. Remove the load and repeat the test. Binding or excessive load can cause a voltage drop.
The object falls or drags on the field
Check the grip without driving first. Then tune the lift height, allow more settling time, and reduce travel speed. Do not increase grip force by commanding an angle that forces the mechanism against a stop.
The robot misses the object or does not stop
Check the approach distance and encoder direction using lesson 5. If wheels turn but counts do not change or have the wrong sign, switch off power: MotorsMoveSync() waits for its target travel and has no timeout. Test driving separately before returning to object transport.
The lesson is complete when the robot starts on a button press, approaches an object, carries it, and releases it in the chosen zone several times in a row. You can now combine movement, sensors, and mechanisms into your own challenges.